Author Archive

Author:
• Friday, January 14th, 2022
Veritas Bevel-Up #1

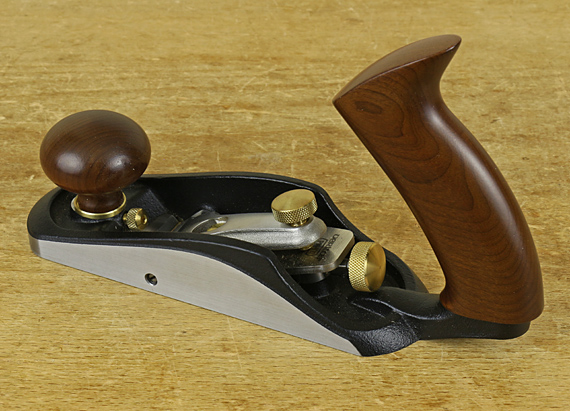
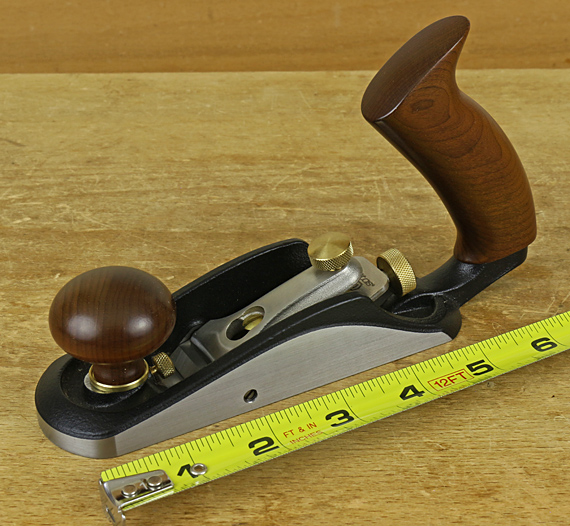
This is the Veritas Bevel-Up #1 plane, which I have been using for a year now. With a 1 7/32″-wide blade, it is indeed small but it works legitimately as a seriously useful plane. An ancillary tool, not a necessity, still I reach for it a lot more than I expected, so I want to share its merits with readers.  

This plane excels for small or concentrated work where its maneuverability and the vision of the work that it affords are significant advantages. In fact, even large projects involve plenty of detail work, such as a leveling touch-up at the shoulder of an assembled mortise and tenon, and fitting small components, especially those involving angles and round-overs. 

What makes this plane worthwhile for me is the feel. While there is some crossover in function with a block plane, this plane is different. Getting both hands in non-cramped positions on the handles of the BU#1 away from the sole affords feedback and control that I really appreciate. I can readily feel the tilt, and I like the excellent visual clearance. I also find that it handles significantly better than the Stanley style (bevel-down) #1.

I keep the BU#1 tuned about like a smoother with the blades mildly cambered. Because there is little momentum behind this small plane, it is particularly important to keep the blades sharp, especially if using a high attack angle. 

Veritas Bevel-Up #1

This plane has a 15° bed so you can sharpen with a secondary bevel of 30° for a good all-round attack angle of 45°. It is also useful to keep a second blade sharpened to 40° or 45° for a 55° or 60° attack, respectively, to use as a touch up plane on difficult grain. The short sole helps in this function. By the way, I would prefer a 20° bed but I’ve covered that issue at length elsewhere

Other features that I like are Veritas’ Norris-style combination adjuster with set screws near the front of the blade to make responsive lateral adjustments, and the adjustable front sole plate with a retainer set screw to easily regulate the width of the mouth. The sole of the BU#1 that I first received was slightly but significantly concave along its length but Lee Valley, being the great company that they are, exchanged it without bother. I slightly touched up the sole of the replacement, just because I’m picky. 

The BU#1 does not suffer from the unfortunate handle design that plagues most other Veritas planes. (They can be replacedtalk to Bill Rittner.) It has only a mild curve but this works well for this plane; it feels right and comfortable to me. 

My usual disclaimer: This review is unsolicited and uncompensated. My goal is only to point out good tools so you can make great stuff.

Author:
• Wednesday, January 05th, 2022
glue flexibility

Wood, and thus wooden joints, moves with moisture changes, and since we put pieces of wood together with glue, it is worthwhile to consider if the glue itself flexes. In other words, how elastic, or stiff and brittle, is the glue itself? 

Here, I want to look at differences among PVA glues, which in almost all discussions get lumped together without attention to significant differences among them in the property of flexibility. Here is a nice simple demonstration.

As background, we know that at one extreme, urea formaldehyde glue such as Unibond 800 forms a rock-hard, extremely strong, rigid glue line making it the best choice for bent laminations. Hide glue also forms a quite hard, rigid glue line. PVAs are, in general, more flexible.

I spread four different glues into approximately one-inch discs on a birch plywood scrap, and then let them dry thoroughly for several days (photo above). From left to right:

Titebond Liquid Hide Glue

Titebond Original PVA

Titebond III PVA

Lee Valley 2002 GF PVA

The Lee Valley glue is a PVA that is claimed to have gap filling properties. I have had good results over many years with this product. Titebond III is touted for its water resistance and as a good all-round wood glue. 

Working on the discs on the plywood, I could not dig my thumbnail into the surface of the hide glue. Even pushing as hard as I could, I could not make a mark. The surface also cracked as it dried. 

The Titebond Original was the second hardest, taking a lot of pressure to make just a trace of marks. Titebond III was clearly the softest of the four; it was easy to dent with my thumbnail. The Lee Valley 2002 GF was intermediate between the other two PVAs.

I also spread discs on a piece of silicone “tape” (non-adhesive wrapping). After they dried for several days, I gently lifted the discs away, which had almost no adhesion to the silicone. I then curled and snapped them (photo below).

glue flexibility

The results were consistent with the thumbnail test. The hide glue was the most brittle but Titebond Original was a pretty close second place. 2002 GF was intermediate; it could snap or curl depending on how I deformed it. Most interesting, Titebond III did not snap at all. No matter how I deformed it, it was quite flexible and only curled.

The simple point here is to show that there are distinct differences in flexibility among PVA glues. How you use that information is another matter. Depending on the type of joint, its dimensions, the wood properties, and the intended use of the piece, you may want more or less glue flexibility. 

Also, this is a separate issue from the strength of the glue bond. There are also several other properties of glue to take into account when choosing among them. 

Now this is obviously not a scientific test. However, I trust my observations in the shop and watching how pieces fare over the years as much as I trust some of the elaborate tests in woodworking magazines. My personal take away is this confirms what I noticed about Titebond III, which is that it is quite flexible, and so I’ve learned to avoid it in certain situations. Titebond Original is a better choice when you want a more rigid glue line and water resistance is not important. 

Category: Techniques  | 3 Comments
Author:
• Friday, December 31st, 2021
wall cabinet

[32″h x 20″w x 8″d] The curved sides of this cabinet started on the bandsaw, of course, but then I used the #20 compass plane, the RP rasp, and scrapers. The best tool for final truing of the curves was a simple purpose-built sanding shave. This is just a 14″-long stick, about 1″ x 2″, with the working wide face planed a bit convex, to which is attached PSA sandpaper. 

With all the tools on which we spend a small fortune, almost every project necessitates a shop-made tool to save the day. 

The dowel joinery went well. I have plenty of experience with it. Well, except for one section where I used too much glue and paid the price correcting a squeeze-out mess. Think! It is so much easier to avoid than to correct mistakes.

Just clamp the carcase together, right? No. The curved sides required specially shaped clamp blocks. It was so easy to draw that nice curve on paper . . .

For the door frame joints, I choose regular mortise-and-tenons rather than slip joints, which look cool but are a major pain to clamp. I routed the mortises and then carefully set up the bandsaw to make the tenons within a shaving or two (or none) with the rabbet block plane. It’s all about making a precise kerf-width-thick gauge.

stiles and rails

There’s a limit to masochism, or maybe not. The unconventional arrangement of the door frame rails and stiles made the final fitting of the doors more difficult. This was, however, a key design element of the piece so it was worth the trouble. The step at the junctions of the inner rail and stile on each door was another pain. A bigger pain would have been to try to assemble the door pieces in the wrong (impossible) order.

After a lot of mulling over, I decided to use magnetic catches. I should have embedded the fixed magnets in the fixed shelf but I made a separate little block for them, which could be removed and replaced if everything did not work out. The catches work nicely but I should not have chickened out on the design.

See the convex front edge of the sides? That feature made everything more difficult, especially the final fit of the doors. Does it matter? Yea, I think so; I like the look. It’s just a matter of deciding if it is worth it.

The problem with one-of-a-kind work is that you never experience all the issues and see the end point until you’re done. Yes, I would have done some things differently if I were to make this again. But I’m not going to.

The top panels are opalescent art glass. I learned a lot about art glass and glass cutting tools and techniques for this project. I installed the glass with strips that are screwed in place, not nailed as Krenov did. 

From the start, I planned to use Z-clips to hang the cabinet. These are essentially metal French cleat hangers but take up only 1/4″ of depth in the back of the cabinet. They must be accounted for when forming the rabbet for the back panel, including some consideration for walls not being perfectly flat. 

Virtually every project requires learning about a new material, technique, finish, or design element. I enjoy that. 

The spalted big-leaf maple panels were a nice find, and they bookmatched well for spalted wood. Like most well spalted material, there were some soft areas that needed hardening. Protective Coatings PC-Petrifier works well with minimal darkening.

For the hinges, bright or even brushed brass just would not look right, and the antiquing on the hinges that I bought proved to be delicate, so I blackened them for good with a solution from Rockler

I could go through a dozen or more other special issues with this piece but you get the idea. The truth is that there is a lot of thought, time, trouble, and – is suffering too strong a word? – in making these things.

Are these details worth it? How about the specialized tools, finding the right wood, correcting mistakes, refining the design (over and over), finding the way out of construction problems, and on and on?

Only the maker can answer these questions. That’s the privilege – and the joy – that comes with making things. Best wishes for you and your projects. 

Category: Ideas  | 6 Comments
Author:
• Tuesday, November 30th, 2021
resawn sapele

Even at this point, I often make small refinements in the design, mostly to make the proportions look good. I also may add features, such as edge treatments. This is small stuff that I do sweat. I am aiming for a certain peace and balance that will make the piece of furniture be interesting at several levels, and ironically, even fascinating.

However, all of this has to be put into the language of wood. The goal is to make something out of wood, not to just make a nice looking drawing on paper. Sometimes as I gradually get the oversized components out of the rough stock, the wood itself will suggest subtle alterations in the design, so it’s back to the drawing board yet again. 

I think of the wood early on in the design process. In fact, I really do not even think of a design in the abstract at all, but instead see it from the beginning as being in a particular wood or at least narrowed to a few possibilities for the wood.

So there is an ongoing interplay among the drawings, the wood, and my imagination.

Now, when the mental dust has settled and sawdust will take its place, I want the wood to be reliable. Oh, and you know where that goes, fellow woodworkers. Recall the words with which the late Professor Bruce Hoadley began his seminal book, Understanding Wood, “Wood comes from trees.” Its essential characteristics make it for good trees; it did not evolve for woodworking projects. 

And so the gorgeous boards of quartersawn sapele that I took home for this project were destined to drive me nuts. I wrote about this a while ago in the post “Weird wood stresses stress me.” 

This was an unusual, hopefully uniquely frustrating situation with the wood. The point here is that once we have settled on a design that drives us, that answers the question “Is it worth it?” strongly in the affirmative, uncertainty still lurks, starting with the first bite of the saw’s teeth into the rough lumber. 

The recipients of our best work do not, in all likelihood, have any idea of this, especially if they are used to veneered particleboard ready-to-assemble “things” (see how civil I’m being). Still, as I pointed out in the first part of this series, these matters are not, and should not be, their problems. 

Yet they are out problems, fellow woodworkers, and indeed we can usually solve them. So, I am not whining but once in a while, it is worth mentioning them, just among us. This is the uncool reality that is infrequently shared in print, but we ought to be able to say, “Oh, you too? That happens to you too?”

Next in this series: construction, detours, and, gasp, mistakes!

Category: Ideas  | Tags:  | Comments off
Author:
• Saturday, October 30th, 2021
cabinet design

Something easy to draw on paper may not be so easy to execute in wood. Though we can and should try to stretch our technical limits to meet the demands of a compelling design, it may be impossible or at least unwise to attempt certain things in wood. Sometimes even an innocent curve on paper has the potential to foul up a construction.

Deviating from established construction methods is fine but there are reasons they are tried and true, so you better know what you are doing and have a sound plan if you diverge from tradition.

With those points in mind, the “hook” for this piece is the curved sides. I knew I was asking for trouble. Whenever there is a major asymmetry in wood removal on opposite sides of a board, the built-in stresses can manifest unpredictably. If the wood has been in storage through many seasons of changing humidity, the stresses seem to reduce themselves, but for recently harvested and kiln-dried wood, there are inevitably some case hardening stresses lurking. The thinnest points of the 8-inch-deep sides are about 1/2 inch less than the thickest points. The sides come out of 8/4 stock. 

But wait, I’m the wood guy, I know how to work around this! Well, dream on wood guy, the wood does not care that you’re the supposed wood guy.

The wood had its own plans as I was to find out. 

The case construction is carcase dowelling, and the techniques I use have proven sound in projects going back more than 20 years. So I felt confident there and similarly for the frame-and-panel construction of the doors and back.

However, the other hook for this piece is the layout of the door stiles and rails. The center stiles do not reach to the top and bottom like the hinge stiles. They are also, along with the middle rails, slightly thinner than the other frame members to create small steps at the joints.

It would have been easier to take the usual approach where the center stiles go all the way to the top and bottom like the hinge stiles. That way, the doors would be easier to assemble and trim to a final fit. But that’s not the way I wanted it. Still, my scheme here is not too unusual and quite doable. 

Other things that required careful thought are the doors overlapping the top and bottom of the carcase, which precludes using a nice Krenov-style door catch, and hanging with Z Clips, which are essentially thin metallic French cleats. 

So, in summary, I felt my design was exciting but brought about some challenges and doubts. Doubts for sure. But remembering the late Wendell Castle’s advice, “If you’re always hitting the target, it’s too close,” I was ready to go.

Now, about the wood . . .

Category: Ideas  | Tags:  | Comments off
Author:
• Thursday, September 30th, 2021
design stage

This will be a series of posts that I have wanted to write for a long time. It will be what is rarely written – a real accounting of a maker’s thoughts from the first idea for a piece through its completion. I will relate my ambitions, joys, frustrations, doubts, successes, failures, and more – all unvarnished and “from the shavings and sawdust of my shop” – in building the piece that started with the sketch above.

Now, why would I want to do that and why might you care?

Magazine articles and books almost always present a sanitized version of the construction steps, and reasonably so. The reader needs a clear layout of the building process so it can be understood and employed, not a replay of a woodworking psychiatric session.

Moreover, when the finished piece is presented to viewers, interested and sensitive observers are generally best served when the piece is mostly left to speak for itself with little or no verbal accompaniment. Questions can come later. That the joints were hard to fit or the wood tore out on the thickness planer are my problems, not theirs, and I have to solve them so they can enjoy the piece.

Yet, Heartwood readers know that I have long emphasized that high-end woodworking is not fast or easy and pretensions to such fantasies by woodworking media are counterproductive. I also think that high quality woodworking, especially one-of-a-kind pieces, are largely underappreciated and not well understood. If that were so, they would probably be in greater demand and fetch higher prices.

So, this is some honest talk for woodworkers. Most of us work alone and all of us encounter doubts and difficulty with the craft. Sharing that can bolster our faith and energy in making things. This can also benefit those who have to put up with our passions or just want some inside baseball about the craft of making really nice stuff from wood. 

I will cover: 

  • Design, starting with the sketches above
  • Wood and materials
  • Construction plans, problems, and detours

The first question, however, is posed in the title. From the outset, a maker has to be convinced that the object is worth building. The concept must be strong, clear, and compelling. The energy has to be there. The plan to execute it must be sound. That’s right, the plan, but as boxing great Mike Tyson has been quoted, “Everybody has a plan until they get hit in the mouth.”

Here we go.

Category: Ideas  | Tags:  | 3 Comments
Author:
• Tuesday, August 31st, 2021
carcase doweling jigs

For designing this joint, I suggest 3/8″ diameter dowels for most work with boards about 3/4″ thick. For components 5/8″ thick, 5/16″ dowels are a better choice. The larger diameter dowels create more glue surface area but you do want to have some minimum meat around the dowel in the long grain workpiece. 

I usually space 3/8″ or 5/16″ dowels about 3/4″ to 1″ apart, on center, as you can see from the jigs, above. Generally, the dowels are closer toward the outer parts of the joint, and spaced wider at the middle of the joint. This is what Krenov taught though I think I am a bit more generous with the number of dowels. You can think of the dowels as individual dovetails. 

I suggest the longest dowel penetration into the side grain workpiece that is possible without getting too close to the outside surface. The hole should not go closer than 1/8″ from the outside surface, and actually more clearance is better. Don’t forget the penetration of the brad point of the drill bit, and the soaking of glue, especially in less dense woods. Many of the dowel joints in my pieces take advantage of an increase in thickness of the side grain piece at the joint as part of the design, which works with the structural needs. 

The penetration into the long grain piece is less critical because it is long grain-to-long grain gluing. It is not going to fail. 3/4″ is probably sufficient in all cases. 

dowels

The best dowels ever were Laurier dowels (above). They were made with great precision and consistency. The compressed flutes expand when water-based glue is used in the joint, making for a tight, strong fit. The spiral configuration of the flutes serves to work the glue up and fully around the dowel as it descends into its hole. 

Unfortunately, these are no longer available. My stash is getting depleted. Here are some options, though I cannot vouch for any because I have not used these brands yet. None of these have spiral flutes, and the available dowels with spiral flutes are not compressed flutes, as far as I can tell.

Dowelmax

JessEm

Bear Woods

Lee Valley

When it’s time to for glue up, it’s worth rechecking the hole depths with a go/no-go setting on a calipers or just a stick. You really do not want to be caught in the middle of a glue up with a surprise dowel projection longer than all the others that prevents the joint from closing. If that happens anyway, grab a coping saw quickly.  

depth setting gauge

As for glue (PVA), avoid being too generous. Don’t ask me how I know this, but it is very easy to overload the holes and make a squeezed-out mess all over your carefully prepared components as you draw the joint together. A simple depth gauge with a hole helps to seat the dowels reliably.

I clamp the joint strongly, having prepared whatever pads and cauls are necessary for a true carcase. 

You can trust a well-planned and executed carcase dowel joint used in appropriate situations. It is not a difficult or complicated joint to make but precision and care are needed. And no, doweling is not cheating. The key is that it opens up design possibilities with practical construction. 

Category: Techniques  | Tags:  | 4 Comments
Author:
• Saturday, July 31st, 2021
dowel jig alignment

Continuing with the carcase dowel joint, shown above is the reference face of the jig being squared to the inside of the carcase. This is the same reference face of the jig to which the side piece was attached as the jig was screwed into place on the end grain workpiece. (See the photo in the previous post.) 

The jig’s end cleat references the placement to correspond with the end grain workpiece. Note that the end cleat should be a bit narrower than the jig itself to avoid interfering with the placement of the square, as seen above. I usually prefer to clamp the jig to the side grain workpiece and recheck it for square before screwing it down. 

Keep track of your references. You can see why I label the jig so much. In this build, the reference face of the jig corresponds to the inside faces of both workpieces. 

I drill all the holes with a portable power drill. I find no need to use a drill press or, if I had one, a horizontal boring machine. The carefully made jig ensures accuracy.

Below, left, the brad point bit is for the cross grain holes but it is slow and tends to burn when drilling along the grain. For that, the DeWalt Pilot Point (middle) bit is my favorite. The standard twist bit on the right works well enough too. Check the actual diameters of the bits to keep the holes consistent.

I have never seen an oversized good quality bit in these categories; they all seem to be made with a one-sided tolerance toward the small side. I suppose this is because all drilling systems have at least some runout, and you can make small holes bigger but not big holes smaller. 

drill bits for doweling

Please don’t use masking tape as a depth stop when drilling these joints. One slip of the tape can ruin a lot of work. And it will happen. So, is there a good drill stop out there? Yes, but you have to make it. But it’s easy. Please see this post

Add chamfers to all the holes – long grain and end grain. This will help with excess glue, and to prevent raised loose chips, which can prevent the joint from closing fully.

dowel holes on side grain
dowel hole chamfers

Next, we’ll look at dowels, gluing, and some joint design considerations.

Category: Techniques  | Tags:  | 4 Comments