It is reasonable to be skeptical of dowel joinery. After all, half the joint involves gluing the long grain of the dowel into a hole where the glue surface is partly end grain with limited true side-grain glue surface. However, the carcase dowel joint, used in the right circumstances and made properly, works and lasts without doubt. Joints in pieces that I have constructed as long as 20 years ago and have been able to observe since are still cleanly tight.
We associate this joinery with the late James Krenov who wrote about it in detail in The Fine Art of Cabinetmaking. Here my attempt is to humbly add tips and refinements, particularly toward ensuring accuracy.
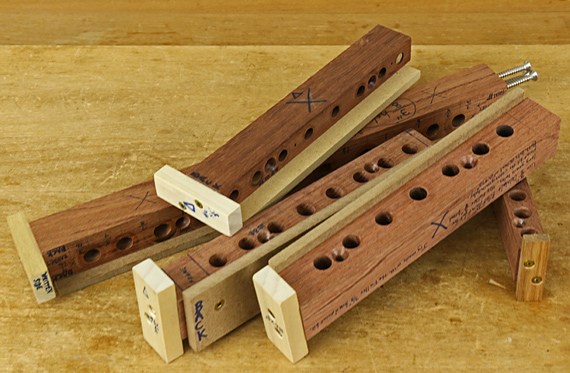
Making the jig is more than half the job for this joint. Use a very hard, fine-grained wood that will hold clean, sturdy holes to last through repeated use, including inevitably repurposing the jig for future projects. I have long used bubinga, though its availability is now limited. Your shopmade jig will be at least as accurate as manufactured jigs of this type, and it will be customized to your project.
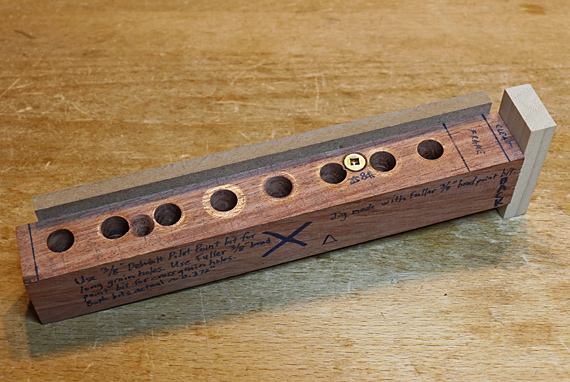
I usually make the block about 1 1/8″ thick (in the direction of the length of the holes) and about 1″ wide. The width does not need to match the width of either workpiece but will, in fact, be a little wider than the end grain workpiece to ensure good seating on the side-grain workpiece. The length will usually be a little longer than the width of the workpieces.
Employ every effort to make the block with two absolutely flat surfaces that are dead parallel to each other. This is critical because the jig will be used to drill from both directions. Any error in parallelism will be doubled when making the joint.
A third face, the reference face, should be flat and dead square to the two faces with holes. The fourth face, which I mark with a big “X”, is not critical.
The holes should be drilled with a well-tuned drill press. This is cross-grain drilling, so a good brad point bit is the best choice.
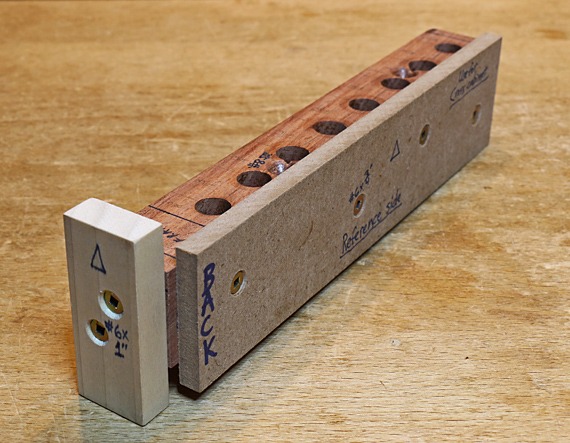
A small, removable cleat on the end of the block serves as a physical reference against the workpieces. This can be augmented depending on whether the workpieces meet flush at their edges.
Krenov’s description shows the block being nailed to the end grain workpiece, using the tablesaw top as a flat reference. I do not like this method. Instead, I use a removable side piece to reference the jig on the end grain workpiece. The jig is attached with two #8 screws going through countersunk clearance holes and penetrating the workpiece only about 3/8″. The jig is attached to the side-grain workpiece without using the side piece but instead squared and clamped to the workpiece, and then screwed in place.
Below, the jig is placed on the endgrain workpiece using the back cleat and side piece to ensure solid referencing. (I have not screwed it in place for the photo.) Note that both the end cleat and the side piece extend beyond both hole-faces of the jig. This allows the jig to be used at both ends of the workpiece.
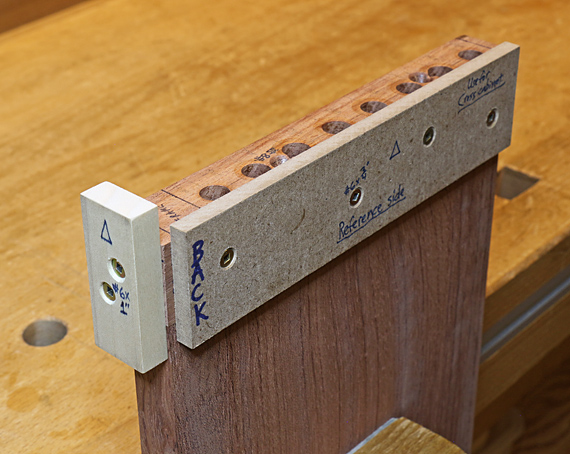
I mark up the jig all over: “back,” “Reference” face, “X” for the non-reference face, the size of screws to use, the drill bits to use, etc.
Now, more than half done, next we’ll look at designing the joint, dowels, drill bits, etc.

I am currently taking summer classes at the Krenov school and this looks familiar!
I like your addition of the back cleat. We are learning to nail the jig to the workpiece, but our teacher mentioned that he uses screws instead. We were taught to create multiple nail holes so if we put a nail just slightly off in the workpiece we have other options for attaching it.
I would imagine that the end of the jig to which the small cleat is affixed MUST be shot perfectly square to the body of the jig, if the cleat is used to reference the jig against a workpiece.
Gina,
Thank you very much for your comment.
The back cleat is just as Krenov shows in his book. The referencing side piece is my addition. Interesting that the teacher modified Krenov’s nail holding method.
As I go through this series on carcase doweling, I and readers would benefit from any additional comments you can offer from what you are learning on this topic at the Krenov school.
Enjoy your classes and please do chime in again!
Rob
Matt,
Yes, indeed, correct! I should have pointed out that the reference end does need to be nice and square to the working faces.
Another thing: Note that I’ve marked the end cleat and the side piece with a little triangle to show the correct orientation for reattaching the pieces so the screw holes line up.
Also, note that the end cleat is a tiny bit narrower than the jig block. This allows a square to meet up to the reference face when using the jig on the side grain workpiece. Photo in next post will make this clear.
Thanks.
Rob
I misunderstood your nomenclature regarding which piece is the side piece and which piece is the back clear, sorry! I imagine if I had read the book I would have realized.
I can add that based on yesterday’s experience: if using nails, it is important to make sure the jig is longer than the longest piece it will be attached to. Otherwise getting it off with damaging either the jig or the piece will be quite difficult. Another reason screws are attractive.
Thanks again, Gina. I wonder what the instructors at the Krenov school would think of the removable side piece. Would you mind showing them this post?
Rob
I’ll try to do it Tuesday! School is out until then to celebrate Independence Day.
I asked my instructor about the removable side piece and he didn’t seem too drawn to it. We use horizontal boring machines for the boards where the dowels are in line with the grain and the side piece would be in the way, requiring removal, or raising the workpiece up on a shim.
He commented that he typically puts the workpiece in a vise, clamps the jig to it, then screws it on.
Thanks again, Gina.
My thoughts:
Not many small-shop woodworkers have a horizontal boring machine.
For working with a hand drill: I imagine that to clamp the workpiece in a vise and clamp the dowel jig to it, the jig would have to be the same thickness as the workpiece. That is, both are clamped from the side by the vise jaws.
I suppose this could work but it adds another precision requirement when making the jig. It also does not allow the jig to be used on different thickness workpieces (at least without shims), which is often necessary in making cabinets such as where the cabinet body pieces drilled on the endgrain are different thicknesses than fixed shelves.
Another option with which I have experimented is to use a much wider side piece that extends a couple of inches down the side of the workpiece. This can be used to clamp the jig to the workpiece from the side. It’s a decent option for thin workpieces but you still need to screw on the jig into the endgrain, and the stock must be very true.
Oh well, there’s more than one way to get these things done. As I’ve said so many times in this blog, the main thing is for each woodworker to find his or her own way that works.
Rob
Rob, I think you are right: horizontal boring machines are probably rare for many woodworkers.
For what it is worth, we were taught to create a new jig for each project, and we make them purposely wider than the ends of the pieces they will be attached to, so that the holes tend to line up more obviously properly if you use the correct face for registration.
He didn’t go into his vise/clamping workflow in any detail, but I imagined he would put the workpiece in the vise, then use a separate clamp to hold the jig to it while he screws it in place.
When I did it with nails, I used a flat surface to lay the endgrain piece and the jig on, letting that take care of alignment while I nailed them together. It was slightly fiddly, but I did have success getting a top and bottom attached by three vertical pieces. I remember kind of holding my breath to see if they would all go together, and they did with no problem.
For other reasons, I ended up plugging a set of holes and redrilling them. It was annoying at the time but was far from the most time consuming fix I had to make along the way, so I guess it wouldn’t be the first thing I would try to optimize. If the holes that needed filling were visible, I am sure I would feel differently about it though.
I like your thoughtful approach to this, and in other places in your blog. Having only done this once myself for a practice project and then for a real project, I haven’t gotten to the point where I have ideas about parts of the process I would like to change.
Thanks very much again, Gina. More to come on this topic. Whew, I haven’t had much time to write lately.
Rob