Hand plane?
I almost always use a hand plane for the final preparation of the wood surface prior to edge gluing.
To hand plane to a final edge as efficiently as possible, I prepare the edge on a well-tuned jointer, my Hammer A3-31, or in a few cases, my cabinet saw. By doing the power tool work accurately, it can take as few as two shavings with the hand plane to finish the edge. Yet they are important shavings because they produce the truest edge and leave the best quality surface for glue adhesion, unmatched by even the best machine.
A production shop using a dedicated ripping setup with a power feeder can produce excellent edges directly from the saw but they are no better and often not as good as those produced by a skillful small shop woodworker finishing with a hand plane. For less critical work, the edge from a tuned small-shop tablesaw may suffice but for high-end work I always use a hand plane, which affords the most control of the process.
Which plane?
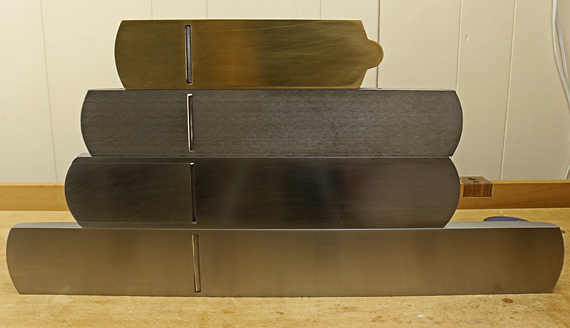
The photo above of the plane soles shows, from the top, a #4 smoother, a #5 bevel-down jack, a Veritas bevel-up jack with its longer infeed sole, and a 22″ #7 jointer with a 2 3/8″ wide blade. Unless you are doing only small work, it is worth having the jointer because its length will bridge valleys and level hills and so make it much easier to produce an accurate edge. You may prefer the massive 24″ #8 jointer with its 2 5/8″ blade but the #7 seems to suit my mostly medium-scale work.
It is important to realize that a very sharp blade is essential for accuracy. As the blade dulls, accuracy suffers because the edge deflects more, the shavings have to be thicker, and you have to push the plane harder with less control.
Methods
For boards up to about 2 feet long, especially if they are 1/2″ or less thick, I find that long grain shooting is the most efficient method. Close the two boards like a book and plane both edges at once so any deviation from 90° is self-correcting when the edges are later joined. Thicker boards can be planed individually, each in its book-match orientation to achieve the same benefit. Occasionally, the grain directions won’t work out but usually you are working on an edge with minimal figure runout and thus without a strong directional grain angle.
You don’t even need a shooting board because the plane sole rides on the work piece, not on the edge of the shooting board. A flat bench top would suffice. Clamp the boards so they don’t shift. Use a shooting plane or an appropriate bench plane.
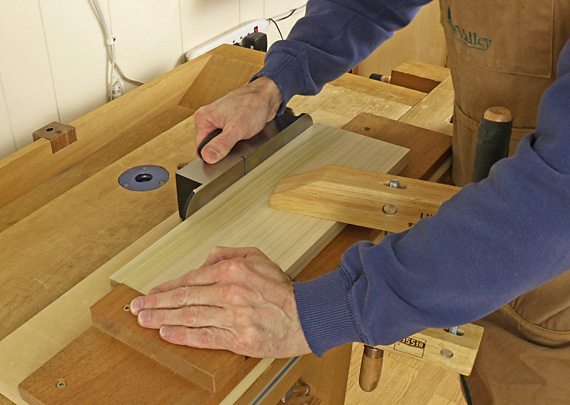
Similarly, you can plane two boards at once held book-closed in the front vise of the workbench, as shown below. If you have done a good job machining the edges and align them together accurately in the vise, the combined width will give consistent support to the plane while the self-correcting geometry will ensure a good joint.
I spread my front hand widely across the plane to be able to sense any lateral tipping of the plane. I am not really using my fingers as a 90° fence but simply aim for consistency along the length of the cut. Errant tipping of the plane will introduce twist in the planed surface and an inaccurate joint.
If planing two boards at once is unmanageable due to their thicknesses or lengths, plane each edge individually. Use a deadman or a jig in the tail vise to support the lead end of a long board while the opposite end is in the front vise.
Then, one option is to plane freehand, using your front hand as a fence. Your goal is to keep the sole of the plane at a consistent angle, hopefully 90°. Check your progress with a square. If your last shaving was the full width of the edge but the square shows the edge is a bit off, do not make the correction by taking a guess and tilting the plane differently. Rather, maintain the same supposed 90° and shift the plane laterally to use the slight camber of the blade edge to take a thicker shaving from the appropriate side. Since there is likely to be some systematic error in your attempt at 90°, it may help to plane the mating board in a self-correcting orientation, if possible.
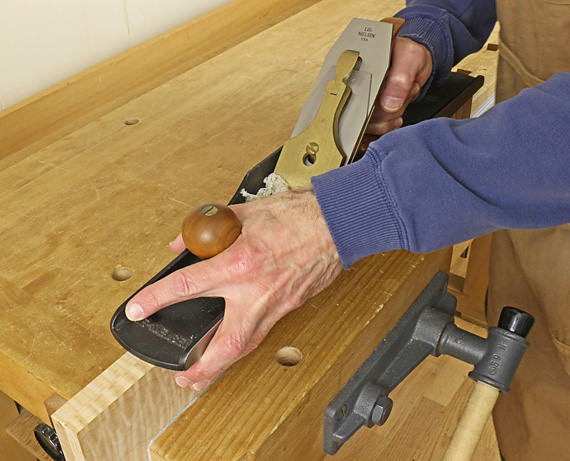
I prefer to use my shop-made plane fence to get the job done faster and more predictably. Below, the fence is attached with three hand bolts entering tapped holes in the sidewall of my Lie-Nielsen jointer plane. Lee Valley makes plane fences. This method has worked for me for 30 years.

Note that even with the fence method I still use a slight camber in the blade edge. This prevents any possibility of a concave (or supposedly straight) blade edge producing joint surfaces that kiss in the interior of the joint with hairline gaps at the outsides.
Use the method that gets the job done for you with the work at hand. With all these methods, try to finish with a full-length shaving.
Upcoming: edge joint alignment, clamp setup, and more.

Rob, Nice series thus far. I really appreciate the approach in your blog. The entries are among my most favorite in my reader. Thanks, Jay
Thanks, Jay.
Rob
I learned from David Charlesworth about taking stopped shavings. You will never get a “bump” with that method.