Measured drawings are an important step in bringing a woodworking project to fruition. However, like sharp woodworking tools, the drawing is not an end in itself, but a means to getting the project done well and efficiently.
For practicality, I make most drawings to reduced scale on 11″ x 17″ paper at my drawing board in the shop. I use mock-ups to sense the real size of the piece, space relationships, and the look of key features. I generally find it necessary to make full-scale drawings only of certain small key elements such as joinery or a critical curve, rarely of the whole piece.
Sometimes it is necessary to go further with full-scale drawings to deal with construction problems that are too difficult to reliably work out at reduced scale. So, if necessary, I will take the extra trouble to make big drawings. I try to keep it simple though.
Such drawings are too big for my small drawing board and 11″ x 17″ paper. A big portable drafting board with a sliding parallel straightedge is an option, but I use an inexpensive ad hoc setup.
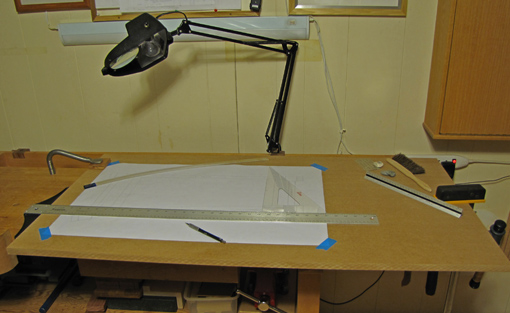
I simply use an adequate size piece of on-hand 3/4″ MDF with one clean straight edge – the factory edge is usually good enough – and clamp it to the workbench under an adjustable-arm lamp. 16 lb. drafting vellum, available at art supply stores in rolls from 18″ to 42″ wide, takes pencil and erasures well. Tape down the corners with #2080 blue tape.
The photo above shows a modest setup with 18″ wide paper cut to about 29″ long. This is just what I need for the project at hand – I’m only drawing one view of part of the piece to work out a particular problem.
An inexpensive T square works well enough. The blade should be reasonably straight but it is not critical for the joint to be a perfect 90°. You also can make your own. The T square works in conjunction with a large plastic drafting triangle. A graduated rule or even a tape measure will handle long measurements.
I prefer 0.5mm 2H lead in a mechanical pencil. Always at the ready are kneaded and white plastic erasers, an eraser shield, and a drafting brush. For drawing fair curves, I use the Acu Arc, my favorite, and French curves.
So, without too much equipment, expense, and hassle, I can break out of the 11″ x 17″ world when necessary. It can be freeing and clarifying to draw and solve problems at full size.

When you have to find compound angles, do you use descriptive geometry/stereotomy?
If yes, you might like the site of Chris Hall
http://thecarpentryway.blogspot.be/2013/02/french-connection-12.html
Sylvain
Thank you for the advice…I thought that autocad had completely replaced traditional ways to draw woodworking designs…
Sylvain,
I work things out from front and side elevations and avoid geometric calculations.
Chris Hall has some awe inspiring things on his site! I’m a fan of Japanese design.
Paul,
At least for woodworkers, I think pencil and paper can solve some problems better than CAD, despite the many other advantages of CAD.
Rob