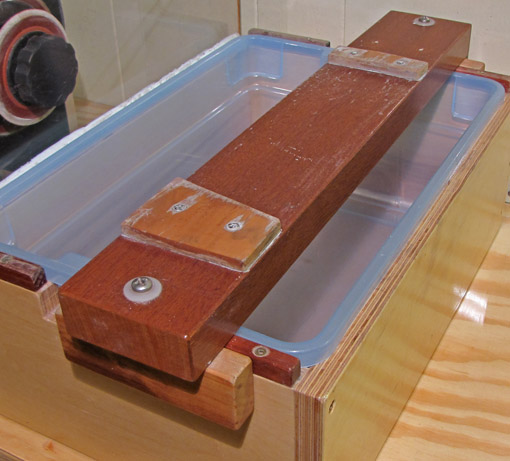
The bridge gets soaked repeatedly, of course, so to avoid wood movement and distortion as much as possible, I used quartersawn mahogany and finished it heavily with polyurethane. It is 3 3/16″ wide, 19″ long, and 1 3/16″ thick. Aluminum or painted steel might be good alternative material, though the wood has endured very well.
A key feature of this whole system is its absolute rigidity in use. The bridge must not shift at all while you work blades back and forth on the stone, yet must be easily removable for clean up while wet.
Cleats, 4 5/8″ long x 1 1/2″ wide x 3/4″ thick, are each attached to the bridge with a single stainless steel round-head wood screw and a nylon washer, just loosely enough to allow them to freely rotate. First, screw the rear cleat in place. Then, to position the front cleat for attachment, use a shim about 0.04″ (1 mm) thick (such as a non-flexible 6″ rule) between it and the outer wall of the box. This will create a slight gap.
In use, a firm sideways bump at the front end of the bridge, to angle it and thereby close that gap, makes it lock tightly to the walls of the box. An opposite bump releases it. This is quick, stable, reliable, and durable. If you prefer it to be less diagonal then shown here (which works well for me), use a thinner shim when attaching the front cleat.

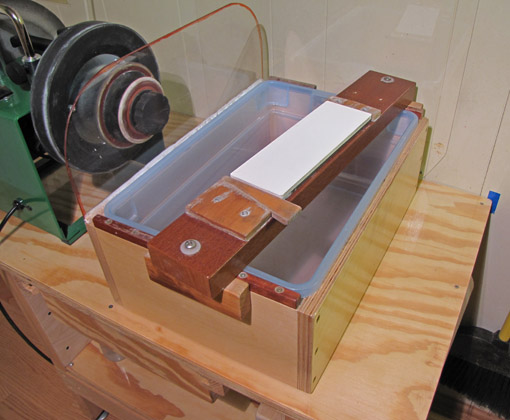
The stone is held firmly in place on the bridge with a simple wedge system. Attached using SS screws, the rear cleat is at 90° and the front cleat has an angled edge, placed to position the stone slightly toward the front of the bridge. The cleats are about 5/32″ 9/32″ thick, which will keep them below the level of my Shapton Glass Stones for a long time.
The wedge angle of 10° works well; a shallower angle might make it hard to remove when wet. The loose wedge is 4″ long so its ends extend beyond the sides of the bridge to allow easy tapping in and removal. I usually use the blade I’m working on to tap the wedge.
The cleats have been ideally placed for the 8 1/4″ long stones that I use, but the loose wedge is long enough to accommodate stones from about 7 3/4″ to 8 1/2″.
I’ve tested the stiffness of the bridge by leaning on it and using a straightedge and feeler gauge. It deflects only 0.0005″ (half a thou) at most. Nonetheless, to avoid error accumulation, I flatten the stones while wet after use, still in position on the bridge, using a diamond lapping stone.
Next: I’ll describe how I use the system.

