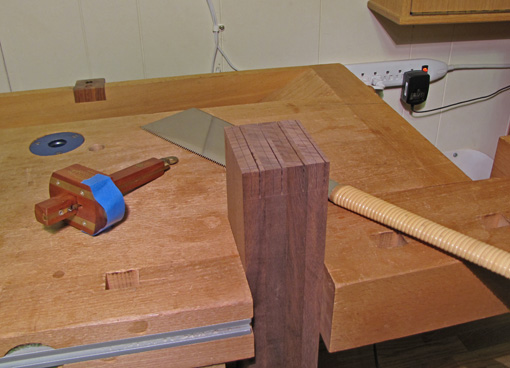
Here are more morsels of shopology from the “sawdust and shavings of my shop” that I hope will be helpful for readers.
1. Recognize the difference between efficient rhythm and dulling repetition. Finding the sweet spot can improve the quality, speed, and enjoyment of your work.
For example, in the above photo, sawing the cheeks for four tenons in a bunch put me in a nice sawing groove, accurate and fairly fast. After four more sets for the other ends, I was ready to move on to other tasks. Immediately doing likewise for another set of rails, would probably have put me over the threshold of monotony, and induced careless inaccuracies.
2. It is helpful to have a separate sharpening station, however modest, so you do not have to clear space on your bench for sharpening gear and the mess that sharpening can create. A dedicated station will also encourage timely attention to edges.
3. Milling rough lumber to finished thickness in one session can be risky, especially if there is substantial thickness or distortion that must be removed. If there is any doubt at all, it is safer to mill to near the final thickness, watch the wood for a few days, then, when it is convincingly settled, go to the final thickness. Then joint the edges and square the ends.
4. Keep router collets clean at all times. A slipped router bit is not fun. I use cotton-tip swabs before putting the router away after use. And clean the pitch off the bits before putting them away. I like CMT 2050 cleaner for that.
5. Be cognizant of the “zoom power” that you are working in. There is a larger margin for error for joints and edges in a basic pine bookcase than in a small, fine walnut jewelry box. Working at the wrong zoom power can create undue stress in the building bookcase, and obtrusive sloppiness in the box. Be practical.
6. Move and adjust the light to where you need it. Just do it. Then resume working.
7. There is almost always a smarter and less smart order to do things in building a project. Without going too crazy, take some time to think about the planned outcomes of processes and what can commonly go wrong. Then plan a course.
8. Without reinventing the wheel, it pays to once in a while rethink common procedures, constructions, and tool setups. Without a doubt, there is always more to learn, and I want to put at least some of it to use in my shop.
Happy woodworking, dear readers.


I am thinking of making a separate sharpening station for the reasons you mention. I just don’t know how to make room for it in my shop. :) I need to do #4 and #6 also.
Hi Jeff,
My sharpening bench has a footprint of 34″ x 19.5″, which is the size of the top. It holds a Tormek and a setup for waterstones on the top, and all my sharpening gear (including the stuff I don’t really need!) in a drawer and shelves below. I use a spray bottle to import water from a nearby bathroom. Sometime I’ve got to show the setup on the blog.
In my basement shop in a previous house, I used a nearby laundry room sink with a “bridge” over it to hold waterstones.
I would not like messing with water or oil at my workbench.
Rob
Hey Rob, great post a lot of good info there. It’s funny because I just recently moved my sharpening equipment from one side of the shop to the other, it’s not far, but I think it will be a big improvement to have the station right next to the bench where I am working, rather than have to walk 15′ away to sharpen. Thanks
Thanks for the comment, Will. Will and Jeff, here’s some more ideas that have worked for me:
My sharpening bench is just 8 inches to the left of my workbench but it does not get in the way. It is a lot lower than the workbench, which suits the ergonomics of sharpening. Also, the front of the sharpening bench is set well back from the front of the workbench so there is room for very long boards in the front vise to extend well beyond the left end of the workbench.
Furthermore, as a right hander, I spend most of my time at the right end of the workbench. My tool cabinet is immediately to the right of the workbench.
This arrangement feels right, physically and mentally.
Hope this stuff helps.
Rob
I’ve come to the conclusion that my workbench is too high for sharpening and I need a solution (a separate horizontal surface). There is also too much clutter in my shop due to my holding on to too many cutoffs, etc. … and much of the clutter actually ends up on my workbench!
I think clutter is also a BIG problem in many hobbiest shops and there is a good feeling when getting rid of it.
Steve,
The surface of the sharpening stone in my setup is a few inches below the height of my workbench top. I determined the height for sharpening similar to the way I did for the workbench, plus experience with previous setups.
http://www.rpwoodwork.com/blog/2011/11/21/how-to-determine-the-workbench-height-that-is-right-for-you/
I agree, clutter is a real issue. I have no choice but to get rid of it because my shop is small.
Rob