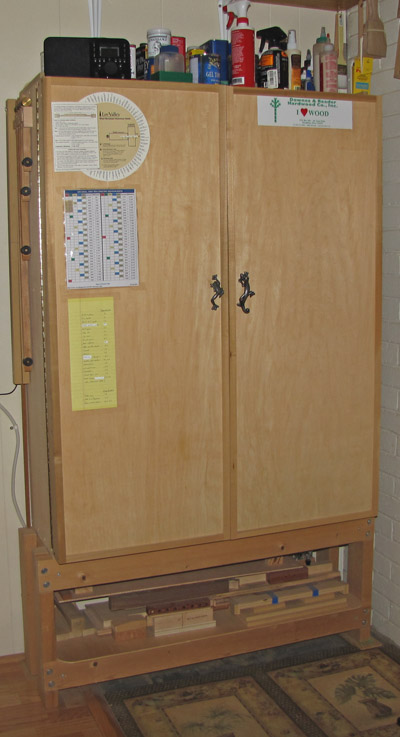
When I built this tool cabinet 25 years ago, I did not expect it to last this long. You know how it is: “I’ll just build something plain and practical now and make something nicer sometime later.” It was a time of stress and joy with a new family in a new house, and, of course, a new shop. My previous systems of tool storage using chests, shelves, cabinets, and even a closet, needed an upgrade and I wanted to make it quickly.
Well, “sometime later” has come and gone, and this old dog is still doing its job well. It is not perfect (what is?) but I feel no need to build a new one. In this series of posts (not necessarily contiguous), I will discuss the construction and features of the cabinet and why it works for me. Though a few readers may want to make one just like it, more likely this discussion will be a source for ideas to incorporate into your own designs for tool storage. I used ideas, many from sources I’ve long forgotten, plus some of my own, for this cabinet, for which I make no pretense of originality.
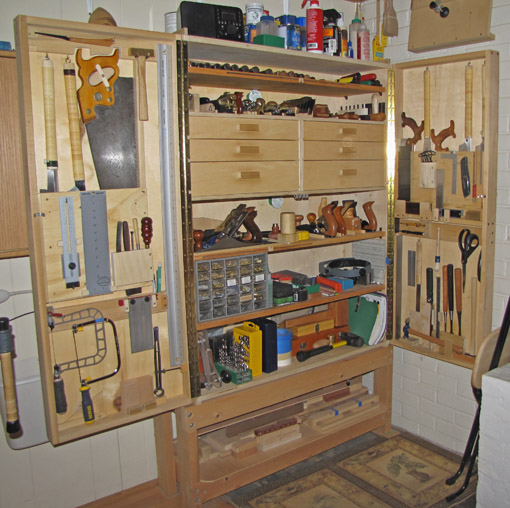
The overall design – a cabinet with two large, deep doors, standing on a low frame – allows a wide-open presentation of my hand tools. When I open those doors, it’s time to work. The great majority of tools can be reached directly, with little or no bending, and without shifting other tools out of the way. Being right-handed, I placed the cabinet immediately to the right of the workbench, giving me quick physical and mental access to the tools. In a small footprint of about 4 feet by 14 inches, a remarkable quantity of tools is stored.
There are many good ways to store hand tools. Everyone is entitled to his preference, but personally, I do not care for dandified tool wall cabinets or dovetailed chests that sit on the floor.
Here we go. The overall dimensions are 48″ high by 37″ wide by 14″ deep. The inside of the cabinet case has a depth of 11 1/4″. It contains three adjustable shelves and an 11″ high drawer bank with six drawers. Four drawers have inside depths of 2 ½”, and two have 3 ½”. The doors have an inside usable depth of 2″. The stand elevates the cabinet 16 ½” off the ground. The back panel extends 2 1/4″ above the surface of the top which has 7/8″ high guard rails on each side. If I was to do it over, I’d probably make the case an inch or two deeper, but this one is doing just fine.

The case is decent quality 3/4″ poplar 7-ply, butt-jointed, glued, and screwed. The rabbeted 1/4″ plywood back and the three-piece drawer bank frame make the case plenty resistant to racking, though it would be better to rabbet the case corners.
The doors are 1×3 poplar assembled with simple glued and screwed butt joints. Each door is nonetheless very sturdy because the 1/4″ plywood panel is glued in grooves all around, and there are several frame structures on the interior. The doors are joined to the case with piano hinges.
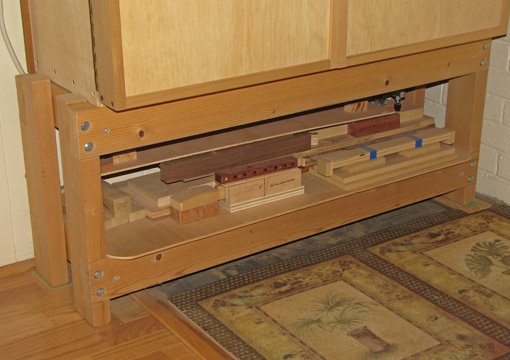
The stand is constructed of notched and screwed 2x4s and contains a shelf for storing jigs and templates. The cabinet is actually standing on the bottom edges of its sides which extend ½” below the bottom. The stiles of the stand extend 1/4″ above the rails to help position the cabinet.

Next: we’ll look at space management, starting with the outside surfaces of the cabinet, and then the overall organization inside.


Rob,
This could not have come at a better time (for me), I desperately need an alternative to the current “hand tools strewn everywhere approach” I have now. I have not considered a free standing unit before hmm…. I have some space next to my bench. Are you keeping this free standing design?
Looking forward to your next post!
Tim,
Good, I hope these posts will be helpful! One of the best advantages of this design is the amount of storage space in a small footprint.
Rob